|
If you know who is going to register on your platform, you can use the
function "automatic group assignment". All you need to do is insert the
e-mail addresses of the respective person(s) in a list.
You can either insert one e-mail address after the other or upload a
list with all e-mail addresses. If you are expecting a lot of registrations, we recommend
to upload one list for each group.

Requirements for an e-mail list - The list needs to be available as
a ".txt" or ".csv" file. Make sure that the file only contains e-mail
addresses! You can use ";" or "," as separators in ".txt"-files.
".csv"-files can be created in every spreadsheet programme such as MS
Excel or Open Office.
Proceed as follows:
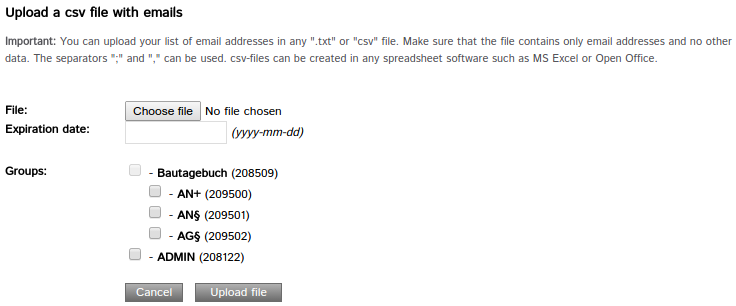
|1| Choose "Groups & Users" from the main menu by clicking on it.
|2| Click on the modify-button in the row "Automatic group assignment".
|3| The e-mail addresses of future registered users are inserted in the table.
|4| Click on the red link "upload list of email addresses" on the left side.
|5| Insert the path to your list of e-mail addresses by clicking on the "browse"-button.
|6| If required, insert an expiration date. As soon as
the expiration date is reached, the automatic group assignment will be
stopped.
|7| Choose to which groups the newly registered users should be assigned.
|8| Click on "Upload file".
|9| Check your settings in the list and make adjustments if necessary.
|10| Save your settings by clicking on "Save changes".

As soon as a person registers on your platform with one of the
specified e-mail addresses, he/she will be automatically added to the
respective group. Users can start to work on the platform immediately.
There will be no more delays caused by manual group assignment.
The e-mail addresses of registered users are displayed in a list below
the "Save changes"-button. This way, you can check who has already
registered and who hasn't. The automatic group assignment will only
work for one registration per e-mail address.
|
|


 continue with:
  return to: